
So you brought the Volca Sample and now you’re stuck with that city-map-sized pamphlet that appears to be the manual. Or perhaps you brought it second-hand and don’t have the manual. This is the basic information you need to get you started with the Volca Sample.
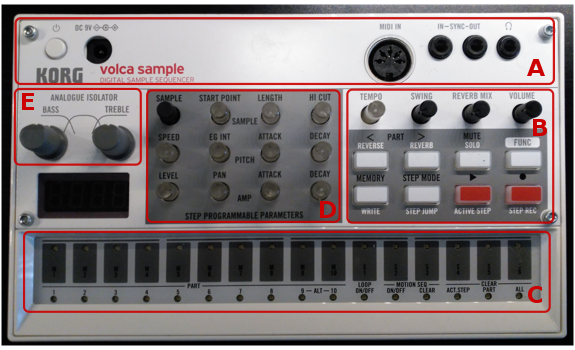
First, let’s take a look at the front panel (see Figure bellow). The front panel can be divided into 5 sections: Inputs and Outputs (A); Performance Controls (B); Keypad (C); Sample Editing Matrix (D), and Analogue Isolator (E). There is also a 4-digit display that the Volca uses for talking to you.
Inputs and Outputs (I/O)
Nothing fancy in this section: there is a power button on the far left, and an insert for the Power Adaptor right nest to it (the power adaptor doesn’t come with the unit, but you can power it using six AA batteries). I use a standard power supply with a 4mm plug (yellow tip), 9V, centre pin positive with at least 1.7 or 2 A of maximum current on the secondary.
On the right side of this section you have a MIDI In port (standard 5-pin DIN). Unfortunately the MIDI capabilities of this device are rather limited (or rather expansive, depending on what you wish to do). Covering it’s MIDI implementation will take a whole tutorial on its own, which I intend to do soon.
To the right os the MIDI port there is a pair of 3.5mm (1/8″) jacks for syncing with the other Volcas. To the far right there you can find the audio output also on 3.5mm stereo jack. This device has some stereo functionality, so you really want to have both channels connected to your amplifier or recording setup. My recommendation is to use a simple 3.5mm stereo jack male-to-male cable for connecting it to other stereo mini-jack inputs. Or use a 1×3.5mm TRS jack to 2×6.35mm TS jacks cable for connecting to 1/4″ jack mono-inputs, like the ones found in most USB-Audio Interfaces, like the FocousRite Scarlett 2i2 I use.
Performance Controls
On the right-hand side of the device there are two rows of buttons toped by a row of four knobs. These are the performance control/main control area of the synth.
The four knobs (from left to right) control the Tempo, Swing, Reverb Amount (listed as Reverb Mix) and Master Volume. Some of these concepts will be developed in later tutorials. The tempo knob blinks in time with the current tempo setting, serving as a visual (and not very effective) metronome. As for the buttons, starting from left to right and top to bottom, you have:
- [PART <] allows you to select the previous part in your setup (10->9->8-> etc).
- [PART >] allows you to select the next part in your setup (1->2->3->etc).
- [MUTE] allows you to mute each part, by selecting it on the keypad. When pressed, parts that are nutted will have their top led on. You need to keep this key pressed while selecting the parts you whish to mute/unmute.
- [FUNC] like a shift key, it modifies the behaviour of other controls, allowing an extra layer of controls.
- [MEMORY] allows you to load a pattern or song: the Volca Sample can store up to 10 patterns and 6 “songs”. Patterns are covered in Tutorial 1, while “songs” will be covered in Tutorial 4. You need to keep this key pressed while selecting your memory slot.
- [STEP MODE] will go into Step Mode for recording and editing patterns.
- [PLAY] starts the sequence.
- [RECORD] enables record mode. Your pattern only starts being recorded when you hit [PLAY].
Using the function key, these buttons will have different, usually more advanced, functions (written in white on the panel):
- [REVERSE] = [FUNC]+[PART <] like the [MUTE] key, the keypad will display in which parts the samples are played in reverse. You can use the keypad to select any part to play its sample in reverse. You need to keep the [REVERSE] key pressed to operate in this mode.
- [REVERB] = [FUNC]+[PART >] The Volca Sample allows reverb to be added on a per-part basis. Like the [MUTE] and [REVERSE] keys, the keypad will show and select the parts with active reverb. You need to keep the [REVERB] key pressed to operate in this mode.
- [SOLO] = [FUNC]+[MUTE] Instead of muting a lot of parts, you may prefer to solo only the parts you are interest in at any time. It works just like [MUTE].
- [WRITE] = [FUNC]+[MEMORY] allows you to chose where to save your current pattern. In this mode the display has the word “SAVE” and the last memory slot selected (either by saving or loading) will blink. The Volca will remain in SAVE mode until you overwrite a pattern (selecting pads M1 to M10) or cancel the operation by pressing [FUNC] or [MEMORY] again. You don’t need to keep pressing [WRITE] to stay in this mode.
- [STEP JUMP] = [FUNC]+[STEP MODE]. While playing, Step Jump allows you to: a) go to a specific point in your pattern, or b) select a number of steps which will temporarily be the only active steps playing. In this mode, the display is set to “StP.J” and the [STEP MODE] and [FUNC] keys will blink. You can exit this mode by pressing the [FUNC] key.
- [ACTIVE STEP] = [FUNC]+[PLAY] The Volca enters Active Step Mode (display will show “A.StP”). In this mode, only the selected steps on the pattern will be played. You can exit this mode by pressing the [FUNC] key.
- [STEP RECORD] = [FUNC]+[RECORD] The Volca enters Step Record Mode (the display will show “S.rEc”. In this mode you can enter steps in a pattern one at a time. This Mode is covered in Tutorial 1. To exit Step Record Mode, press the [FUNC] key.
Keypad and Display
The Volca Sample used both the Keypad and the display to show information on its current status, the part selected for editing, which parts are muted, or soloed, or using reverb, etc.
The keypad can also be used to play the instrument live (using pads 1 to 10). Together with the [FUNC] key, it can be used to clear the working memory, or parts of it; and to set each sample to loop indefinitely while active . This later facility is very useful if you are interested in doing some wavetable or granular synthesis with this device. These functions will be explored during these tutorials.
Sample Editing Matrix
The Sample Editing Matrix takes the lion’s share of the real estate on the front panel. It lies inside a grey rectangle with the caption “Step Programmable Parameters”, which also hints at the possibility it offers to record automation (or Motion Sequence, in Volca parlance) for each of these parameters, on 11 of these 12 knobs.
On the first row you have some setting that affect the sample playback: on the left there is a rotary encoder (black) to select your sample (when touched, the display will show “S.XXX”, where XXX is the sample number, then moving it will change the sample). This is the only “knob” you can not automate. Moving to the left you can set the playback start position (in “percentage” from 0 to 127), the sample playback length (also in “percentage”) and you also have a simple low pass filter cutoff.
On the second row you can adjust the pitch of your sample. This is done by adjusting the playback speed, using its dedicated knob or by applying an Atack-Decay (AD) envelope with positive or negative intensity. No time-stretch facilities exist on the Volca.
Finally, the third row of knobs controls the amplifier section of each part. Here you can adjust the volume, the stereo pan and also edit a simple amplitude AD envelope.
These features will be explored Tutorials 2 and 3.
Analogue Isolator
Finally, at the very end of the sound processing chain, the Volca Sample offers an Analogue Isolator. You can think of it as a very simple EQ with a low shelf and a high shelf (I’ll try to measure their cut off values in the future). This is a simple two knob affair, that can boost your basses and/or your highs from -6dB to +6dB. There is no way to make a specific part bypass this stage, or record its automation.
On the next tutorial, we’ll see how to record and edit patterns in the Volca Sample.